Collector of Art/ Craft Supplies

Ok, I will admit it.  I love to collect & craft t items like a kiln or loom, even when I have no idea how to actually use the item.  This provides fodder and amusement for my husband when he talks to his friends, I recently learned.

But wait!  I know that one day I will take a ceramics course,  or join the local fiber guild and learn to weave.  Really.  Well, it could happen…

XframeSalesPampletsI just could not pass up the opportunity to own a mint condition, wonderful old Gilmore loom.  My friend, Faith’s sister-in-law needed to find it a good home.  All I needed to do was drive to the Silicon Valley and pick it up with my truck.

In my way of thinking, the loom and other items were picked up for free or for minimal investment, so why not have them in case I should want to weave or create pottery or fused glass?  I have always wanted to take art glass classes, or at the very least make glass beads.

This is how I think.  Of course, being married to a practical engineer who desires an empty garage, he approaches it in a whole new light.  Luckily for me, my dear husband knows that the secret to a happy marriage and happy wife is to turn a blind eye when “items” show up.  🙂

Of course, one day I will indeed learn how to weave, and create with glass.  Until then, my loom sits next to my lovely antique card catalog that I picked up from UCLA when they converted to computers, exercise equipment, fabric stash and too many other art/craft supplies to mention.

Am I the only creative soul who buys things for just in case??  C’mon, confessing is good for the soul.    Cheers, Carla


Peyote Necklace to Match Jacket

Here is the second project in my series.  I am creating jewelry pieces out of seed beads, fibers, metal or other beads, to match some of the jackets in my closet.

Here is what this jacket looks like- a colorful blend of fuschia, purple,coral, and orange.

Jacketinspir

Hard to see the true colors in this jacket picture, but it looks better in person than in the image.  I picked it up at a Chico’s sometime in my past.

The goal was to make a matching jewelry piece that I can wear with this jacket.  So what pattern did I use?

I used my peyote pattern, titled Undulations, from the free tutorial page, to create the necklace, which looks like this:

jacketundulationsnecklace

Here is a close up image of the necklace’s button closure:jacketbuttonclose

I do love that the colors chosen for the necklace mimics the flow of colors in the jackets.  I plan to make a matching bracelet, too.

Here is one last image of my finished creation, next to the jacket:

jacketnecklace

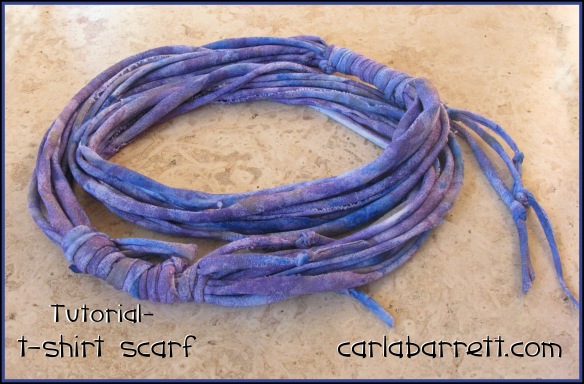
Recycled T-shirt Scarf Tutorial

tshirtscarftutorial

I had an hour of free time last night, so I decided to recycle one of Joe’s old t-shirts and make myself a scarf out of it.  This project was fast, easy, and only took me less than an hour start to finish (not counting the paint drying time).

Supply List:  tshirtsupplylist


Tip: Cut off the t-shirt hem and under the arms as directed in the photo above.  Notice how the t-shirt material curls and rolls as you tear?  You will want to paint on the top side, which may mean you turn the shirt inside out before painting

Once the above items were gathered, I laid down the plastic trash bag to protect my kitchen counter and just started painting.  In the photo below, I used some purple, blue and silver metallic fabric paints.  I work very fast, so it took me only 10 minutes to paint the t-shirt.  Note that I used an inexpensive foam paint brush and some fabric paint I had on hand.

tshirtpaintThe painted t-shirt was then taken outside to my garden faucet.  I scrunched up the shirt and lightly soaked it to blend the paint.  I used my fingers to blend any white areas or would simply rub the damp fabric to saturate the t-shirt fabric.  Here is what my painted fabric looks like after wet blending the paint:

paintanddry

Next, I hung up the fabric outside until dry.  Notice that I left the hem on, knowing I would tear it off later.

tshirthang

Tip: Once your fabric is dry, I recommend you heat set it, depending on your brand of fabric paint.  If you are not sure, go ahead and heat set the fabric to prevent color bleed.

The next step is to cut and tear the fabric into strips.  Here is a helpful illustration to show you visually what I plan to do next:

tshirtscarftearingguidecutstrip

I found that by snipping through the side seam first, then tearing until reaching the other side (about an inch away), you could then use the scissors to cut your t-shirt strips to create a long loop.  Here is another visual for you:

tearstrips


Here is what your loop will look like:

tshirtstrip1

To make the t-shirt fabric roll nicely, you just need to stretch it gently.  Here is what my finished strips looked like once I bundled them together and used other rolled t-shirt strips to tie them into a lovely scarf:

tshirtscarf3

At this point, you could embellish your scarf, add beads or tie charms to it.  Braiding some of the strips is another option to try. Really, how you finish it off is up to you.  I used the leftover strips to make dangling bits and for added texture.

If you make one, I would love to see it!  My contact info is above.  Hope you enjoyed this free tutorial.  If so, go ahead and leave me a comment.  Regards, Carla

New Images of Fabric Crochet Purses

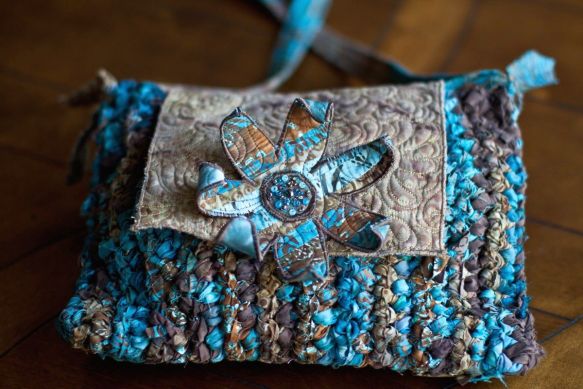
Lauren also took digital images of my work, too..  I love how she captured detail images of my fabric crochet purses, so I thought I would share some of these with you.    I started crocheting with fabric many years ago- inspired by generations of women who created rag rugs using old clothes for practical reasons.  I remember that the first one I made was during a Lori and Carla Creative Adventure Week, so Lori may have taught me how to crochet with fabric or vice versa.

I have taught my crochet purses/bags as a class many years ago at High Sierra Quilters, and plan to offer this technique, along with my embellishment techniques, in the future as an online eClass:

Some images of my Autumn fabric crochet purse.  The colors in this purse are quite striking and it is an easy beginner project:

crochetbagdetail

Notice how well the fabric has held up over the years.  Below are some embellishment details of the front: crochetbag1

The leaves feel and look like suede, but instead are made with one of my techniques:

crochetbagleaf

Above is the back of the purse.  Her is another color way using different colors:

browncrochetbag

Notice the embellishment flower on the front?  Here is a detail shot of the flower and beaded center:

crochetbrownbagflower

I have also made this bag using spring color fabrics, here is an older image I took many years ago:crochetpurse2


Commercial fabric was used in the bag, shown above, and I was starting to experiment with various types of bag closures.

Here is the very first one I made, I used mostly hand-dyed fabrics: crochetpurse


Anyway, I hope you will consider taking this class when I convert it to become an online class or if I decide to teach it again at quilt stores or shows.  Take care and have fun creating!  Carla


Carla’s Studio Tour

Gift from Barb Kiehn

Gift from Barb Kiehn

If I am being really honest, my studio looks like a tornado hit it most of the time.  Since I had a photo shoot the other day, I needed to clean it up so it looked good in the photos and created the illusion that my studio was perfectly organized all the time.

Carla Barrett Quilt Studio

Carla Barrett Quilt Studio

While it was still clean yesterday, I decided to take images of my studio to share, and to show you the cool things I have collected.

In the photo on the left, you see the next two quilt tops that I will be working on.  The modern quilt in the foreground is for Lyn B. and the quilt top in the back is for Teddie E.

The brand of longarm I use is by A1 Quilting Machines.

Carla Barrett's sock creatures

Carla Barrett’s sock creatures

Way in the back are 2 sock friends keeping watch on all my activities.

The one on the right was made by me and the one on the left is by artist Darlene Veltman, who teaches classes on creating Silly Sock Creatures.

The sock creatures are sitting on a stunning Tentmaker of Egypt quilt that the wonderful, talented Barbara Chainey picked up for me on her last trip there.

Carla Barrett Studio

Carla Barrett Studio

The next studio picture shows you my desk where I sew, draw, bead and work, that is, when it is not piled high with stuff!  (Click on image to enlarge)

I sew with my 1980’s vintage Bernina.  It is metal, heavy duty, and sews like a charm!  I also own several other machines, including an antique Singer, a Janome 6500, a Viking, and a Bernina Serger.

by Carla Barrett

by Carla Barrett

Here is a close-up of what’s under my needle, and be sure to read the words on the small quilt piece which reads, “Suddenly it was clear, Blondes DO have more fun.”

In case you didn’t know, I have blonde hair!  I’m blonde, but not a dumb blonde- LOL!

In the spirit of “Where’s Waldo,” can you find the following items in the picture below: cartoon by me, Alma Stoller‘s birdie, and beaded beads, felted cupcake by Betz White, Poppy art by Geninne Zlatkis, heart by Mary Stanley, small kitty illustration by Carla Sonheim, part of my sand collection, eraser carved shell by me, my alligator/lizard beaded bracelet, a water powered clock, and a fiber jewel heart pin by Meg Hannan.

Carla Barrett studio

Carla Barrett studio

I love to collect art from other mixed media artists!  Can you tell?

In this picture, I have lots of beads,  or trinkets, plus some projects underway.

bead collage by Carla Barrett

Collections like this make me happy, I just love the visual texture and color!  Below is a shelf series from around the studio:

Carla Barrett Studio detail

Carla Barrett Studio detail

Above, I most love my faux coffee cup, which has a fiber project inside.  I passed these out to other artists one year at ArtFiberFest.

Below, my favorite item is my Fiber Food Round Robin Project.  I picked the theme- which was a Hungary Man TV dinner, and then the recipients put together each section.  You can see what I made for others at this blog post.  Also in the photo, you will find a scissor maiden by Syd McCutcheon.

Carla Barrett Studio detail

Carla Barrett Studio detail

carlastudio8


This shelf is rather bare- as compared to other shelves in my studio.  I love the metal coffee cup, the wire chicken, a great book about Frank Lloyd Wright, and a fabulous book on art by Simon Schama, titled Power of Art.  I also love the BBC series by him as well.

That’s my studio tour for today!  Hope you enjoy it- and some of my odds and ends.  Do you have a studio and do you keep mementos around, too?   Carla
Works in Progress- Late November

Thought I would show you what I am working on right now.  First up is the remake of my “Hairy Leg” Quilt.  This fun quilt was designed with my good friend, Lori Seavey-Christian, when we made quilts together.  The name comes from the “hair” I quilted into Lori’s quilt.

work-in-progress by Carla Barrett

Sharp eyes will notice that I still have to quilt in the legs and hair still.  LOL  I plan to use different color thread for this.  Anyway, this quilt is free-handed (meaning it is hand guided) with my A1 longarm quilting machine.

Next up is my Tropical Leaf design that I am using pigment paint to color.  As you can see in this picture, I only have one section/color completed so far:

Digital Quilt Design by Carla Barrett. May be purchased at digitechpatterns.com

I decided I needed some new colors, so I am awaiting my pigment order to finish.  The digital designs of my Tropical Leaf set is available at Digitech Designs.  I do have lots more digital designs waiting to be released in 2013, too.

Because I tend to work in several mediums at once- I am also working on a freeform beaded project for a quilt.  I hope to finish several quilt designs featuring my freeform beaded work on them in 2013!

Your turn- what are YOU working on?  Hugs, Carla

Stitch & Grip Quilting Disks

I tried out a wonderful new product today that I wanted to share with you- the Stitch & Grip Quilting Disks by Clever Craft Tools.   Here is a picture of what these quilting disks look like:

Carla’s Review:  The Grip & Stitch Quilting Disks makes quilting with your home sewing machine so much easier to do!    This is a must buy item for all machine quilters who use a sewing machine to quilt.  Why?  When I tried them out on my Bernina, the Grip & Stitch Quilting Disks really improved my quilting control without putting lots of stress on your arms, shoulders and neck muscles.  These disks really do grip the quilt sandwich and improves your control!

I found them much easier to use than quilting with the white quilting gloves, plus I was able to gain more control of my quilt sandwich without stressing out my neck and back muscles.  It is a simple, yet brilliant idea and product from Clever Craft Tools.

Google the product for a list of online retailers.  If you are a shop owner, I am sure you may contact the company directly for wholesale information.

I hope you have enjoyed hearing about the Grip & Stitch Quilting Disks.  I always love to try new products out and give my opinion.  🙂     Hugs, Carla

Blog Disclosure: I was provided this product to try out and provide feedback to the company.  My review of this product reflects my honest opinion and I am not affiliated with the company, nor have been paid for this review.


Having tried machine quilting on my sewing machine with other products (like the quilting gloves, hoops, etc.), I was happy to discover that the Grip & Stitch

More Feather Star Quilting

Here are the updated images for the green feathered star quilt:

I am now working on the center quilting design, and plan to finish quilt on Monday.   Here is the center section, with a pin in the picture to show you scale.  I added some SID to the center star area, too:

I will update this post later to provide what designs are quilted freehand and which ones are digitized.  You all know I love to give credit to designers if I use a stencil or digitized design on a quilt.

Enjoy your weekend!   Carla

Work in Progress Quilt

I am testing out one of my quilting designs, and decided to pull out my pigment paint to color this quilt.  Here are a series of pictures:

Quilted sample featuring my design in the center:

Starting adding color.  Notice how vibrant the color becomes when I add aloe vera gel to the pigment color?

Now working on the background behind my design:

This center design is available from Digitech Designs located here.  

Back to coloring!  Carla


Last Few Days for Registration

A quick post to remind everyone that the Pixeladies Intro to PSE Class is filling fast- and that class will start next Monday at StepOnPins.com.  We decided to offer this class once again, especially since this class fulfills the prerequisite for my April class on Tablet Design.

In preparation for the Tablet Design class, I am working hard on expanding my in-person Tablet Design class into a 3 week class with numerous video lessons with handouts, creative exercises, visuals, and lots of information about using your tablet, along with Photoshop Elements 10, to create quilting designs, draw and design quilt tops like I do, plus many other skills.  Here is a sample quilting design that I drew for Debbie Bainbridge’s quilt during a 2011 Quilt Whisperer class:

Mark your calendar- the registration for the Tablet Design Class will begin on March 15, 2012 at 9 am PST.

Last note:  Many of you blog subscribers may have noticed the 11 or so email notifications with the last post.  Apologies, however, this was a wordpress glitch.  I did notify wordpress about this and deleted all the extra posts.